

Getting Organized with ChatGPT Projects
A Guide to Structuring Your Conversations and Boosting Productivity


Anytime is a good time to get organized.
If you’ve ever scrolled through a long list of past chats in ChatGPT trying to find that one recipe, brainstorming session, or coding Q&A, you’re not alone. With heavy use, any chatbot (ChatGPT, Anthropic’s Claude, Perplexity, or Grok) can quickly become disorganized.
Today, many of these platforms offer project or workspace‑style features to help you sort your chats into dedicated spaces or folders. Getting organized with these features can potentially save you lots of time and mental strain.
It’s worth noting that some of these platforms only offer these features on paid‑tier plans. Grok’s new workspaces feature, for example, is available on its free tier (with some limitations).
If you’re not on any paid plan, don’t worry—there are tips and tricks below to help you stay organized even without built‑in project tools.
Note: In this post, we’ll use ChatGPT Projects (on a desktop browser) as our primary example. Most of these concepts translate to Claude, Perplexity, Grok, and other bots with similar workspace features.
Table of Contents
🕖 TL;DR
📂 Why Projects Matter
🚀 Setting Up Your First Project
📌 Organizing Chats Into Projects
📚 Giving Context to Your Projects
🏷️ Tagging
🔧 Best Practices & Maintenance
🎯 Bonus: Tips & Tricks (Especially for Free‑Plan Users)
🏁 Final Thoughts
TL;DR
Organizing chatbot conversations into projects or workspaces makes it easier to manage tasks, keep context, and find what you need faster. If your platform supports project tools, use them. If not, there are still plenty of simple workarounds to help you stay organized — 🎯 Bonus: Tips & Tricks (Especially for Free‑Plan Users)
Why Projects Matter
Chatbots are powerful tools. But without some structure, your conversation history can quickly become chaotic and disorganized. This is where Projects (or workspaces) come in. Think of them like folders for your ideas, tasks, and ongoing workstreams. Here are some ways they make a big difference:
Staying Focused
Projects help you compartmentalize. You can create separate spaces for different topics or goals like: "Vacation Planning," "Client Work," or "Weekly Reports." This reduces distractions and keeps each chat aligned with its purpose.Persistent Context
Each project can include background instructions, uploaded files, or notes that carry over into every new chat you start inside it. That means less repeating yourself, fewer context resets, and more consistent responses.Streamlined Workflow
Jumping between tasks becomes easier when each one lives in its own space. No need to scroll endlessly or wonder “what did I name that conversation?”—your workflow becomes more seamless and intuitive.Faster Retrieval
When everything’s sorted into its proper place, finding past chats takes seconds. You can locate what you need by project instead of trying to remember exact phrases or timestamps.
Setting Up Your First Project
Create New Project

In ChatGPT: Click the ➕ icon near Projects. (Other platforms: Look for "Workspace," "Folder," or "Project."
Enter the name of your project into the box that pops up then click “Create Project”
You should be brought to your new project workspace area.
Explore Your New Project

On your newly created project page, you will be able to do the following:
Customize Folder Color: Click on the folder icon above your project name and a dropdown of colors will appear. I had actually just learned about this feature a few days ago.
Change the Name of Your Project: Click on the project name and a popup will appear allowing you to edit the project name. This can also be achieved by clicking on the three vertical dots icon at the top right of the screen
Start a New Chat: This should be self-explanatory 😬.
Note: If you added files and/or instructions, each new chat will use that data for context. If you uploaded a PDF document on say, Bitcoin, you can start new chats asking questions pertaining to that document — almost like you are “talking to the document”.
Add Files
Centralized File Access: Files uploaded to a project are accessible in all chats under that project. This means you don't need to re-upload the same document for each new conversation.
Persistent Context: The AI can utilize the content of these files to inform its responses, allowing for more context-aware interactions.
Supported File Types: You can upload various file formats, including PDFs, Word documents, Excel spreadsheets, and more.
Add Instructions
What ChatGPT should know about you or the project: For example, "I'm a software engineer working on a Python-based web application.”
How you’d like it to respond: Such as "Use concise, technical language and provide code examples when possible."
Consistency Across Conversations: Maintain a uniform tone and focus throughout all project-related chats.
Time Efficiency: Avoid repeating the same context or preferences in every new conversation.
Enhanced Personalization: Tailor the AI's responses to suit specific project needs or personal preferences.
Note: While global custom instructions (found in your profile settings) apply to all your ChatGPT interactions, project-specific instructions are confined to the individual project. This allows for greater flexibility, enabling you to customize the AI's behavior based on the unique requirements of each project.
Delete Project
Access project options: Hover over the project name to reveal a three-dot menu icon (
⋯). You can also delete the project by clicking on the three-vertical-dot menu icon (⋮) in the top-right of the screen.Deleting a project is permanent. All chats, files, and instructions within the project will be irretrievably lost.
Ensure you have backed up any important data before proceeding.
⚠️ Privacy Considerations: Be cautious about uploading sensitive information, as files are stored on OpenAI's servers and may be used to improve model performance.Organizing Chats Into Projects
Keeping your chats organized within dedicated projects helps streamline your interactions and makes it much easier to revisit past conversations. Here’s how you can manage your chats within projects:
Start New Chats Within a Project
When you're working on a specific project, it's beneficial to keep all related chats neatly grouped.
Activate Your Project: First, ensure you're currently viewing or have selected the desired project workspace from the sidebar or main dashboard.
Initiate a Chat: Click the "New chat" button that appears within your active project workspace.
Automatic Context: Chats started within an active project automatically inherit the project's context (any files you uploaded or any instructions you added), ensuring consistent and focused interactions without manually setting contexts each time.
This automatic inheritance can include project-specific custom instructions, related files or documents, and conversation themes, streamlining your workflow and reducing repetition.
Move Existing Chats into Projects
Already have existing chats that you want to organize? You have two straightforward options:
Drag & Drop:
Simply click and hold on the chat from your conversation history.
Drag it over to your desired project workspace in the sidebar.
Release the mouse button to drop it into the project.
This action quickly relocates the chat into the selected project, immediately inheriting its context the next time you starting chatting.
Context Menu:
Locate the chat you want to move in your conversation history.
Hover over the chat menu item and click on the three-dot (⋯) context menu icon beside it.
Select "Add to Project …" from the menu.
Choose the target project from the list provided.
Giving Context to Your Projects
Make your workspace effective by adding relevant resources and instructions:
Use Meaningful Project Names
Include dates, topics, or outcomes ("Spain Trip Planning 2025").
Use emojis or shorthand for easy recognition. You can ask ChatGPT what emojis to use.
Example: Spain Trip Planning 2025 (🇪🇸 ✈️ 📅)
Persistent Instructions
Set project-wide context with custom system prompts:
Background: "Our company ACME Corp is a fintech startup..."
Role & Tone: "You are acting as a friendly career coach."
Constraints: "Use data from 2021 onward, metric units."
Shared Files
Upload relevant PDFs, CSVs, images, or text docs:
Research Papers: Summaries or comparisons.
Meeting Transcripts: Extract action items.
Datasets: Conduct analyses.
Drafts & Notes: Ensure consistency in ongoing projects.
Tagging
Tagging is a powerful way to visually and semantically organize your ChatGPT Projects. Tags can help you quickly identify the purpose, status, or context of each project at a glance.
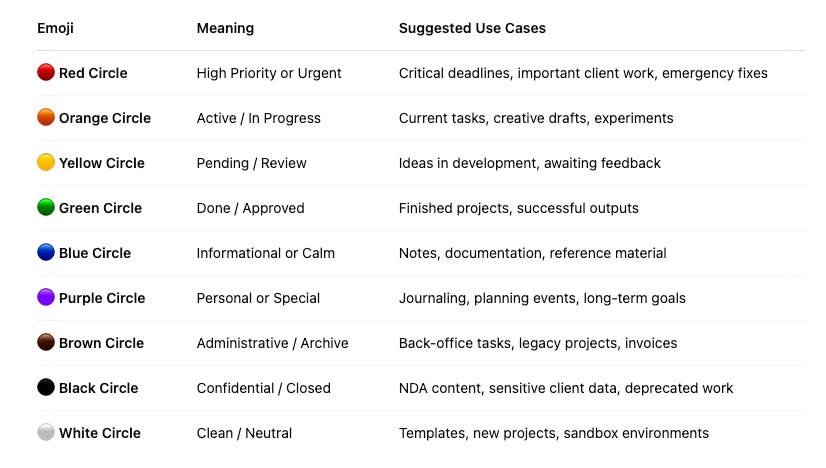
Color-Coding Tags
Project folders in ChatGPT can be color-coded, making it easier to scan and prioritize your workspace visually. You can assign meanings to different colors or emoji circles based on your personal or professional workflow.

Name-Based Tags
Prefix with categories:
Add a short label at the beginning of your project name to keep things grouped.
Examples:
Work - Weekly Meeting Notes
Study - Neural Networks
Client - Logo Concepts
Sandbox - Prompt Testing
Use emojis for quick recognition:
Emojis help you instantly recognize the type or purpose of a project.
Some commonly used emoji tags:
📚 Education: Coursework, reading notes, research
💼 Client: Freelance or consulting projects
🛠️ Build: Projects in progress or under construction
🧠 Think: Brainstorming, ideas, mental models
📝 Draft: Writing projects or blog posts in progress
🎨 Creative: Art, design, content generation
⚙️ Tech: Technical or engineering-related content

Combining Color and Name Tags
To create a more intuitive system, combine both color coding and name-based tags.
Examples:
🟠 + 💼 Client – Rebrand Strategy Notes (in progress and client-related)
🔵 + 📖 Study – AI Alignment Readings (reference material for study)
🟣 + 🧠 Think – 2025 Vision Roadmap (personal or strategic thinking)
🟢 + 📝 Draft – Newsletter Final Copy (completed writing)
Benefits of combining:
Easier visual scanning in long project lists
Reinforces status and type of project at a glance
Helps with sorting and prioritization
Adjust the system over time as your workflow evolves. The key is to stay consistent so you always know what each tag or color means.
Best Practices & Maintenance
🎯 Define Clear Scope: Avoid broad projects; keep them focused on specific goals or topics.
✂️ Split When Needed: If a project becomes too large or scattered, break it into smaller, more manageable ones.
🧹 Regular Cleanup: Delete trivial or outdated chats; archive completed projects to keep things tidy.
💾 Backup Essential Outputs: Regularly export or copy important content to your local system or cloud storage.
♻️ Refresh Context: Update custom instructions and files as your project direction evolves.
⚖️ Mind Instructions: Make sure your global and project-specific instructions don’t conflict or cause confusion.
🧰 Leverage Built-in Tools: Take advantage of features like file uploads, custom instructions, or code interpreters.
🔐 Stay Security-Aware: Avoid uploading sensitive or personal data unless necessary—and only in secure environments.
🏷️ Use Clear Naming: Choose descriptive, concise project names so you can recognize them at a glance.
📆 Review Projects Weekly: Set a time to audit and reorganize projects for better clarity and continuity.
🧭 Prioritize Actively Used Projects: Keep frequently accessed projects near the top or clearly tagged for quick access.
✍️ Document Decisions: Note important conclusions or changes within a chat or in a pinned message to avoid losing track.
Bonus: Tips & Tricks (Especially for Free‑Plan Users)
Even without built-in project or workspace features, you can stay organized with these creative workarounds:
🗂️ Manual Folder Structure: Use your computer’s file system or a notes app (like Notion, OneNote, or Apple Notes) to mimic project folders.
🏷️ Consistent Naming Conventions: Prefix chat titles manually (e.g.,
[Trip],[Code],[Draft]) for easier sorting.🔎 Tags or Emojis in Prompts: Begin your prompts with a tag or emoji (e.g. #MarketingPlan, 🧠 Brainstorm)
🔖 Browser Bookmarks: Save direct conversation links into bookmark folders (organized by topic or project).
📤 Periodic Exports: Regularly copy and paste important chats into centralized documents (Google Docs, Notion, Evernote).
🖼️ Color-Coded Screenshots: Take screenshots of key exchanges and sort them into labeled, color-coded folders for quick offline reference.
🗓️ Daily or Weekly Logs: Maintain a simple running log or journal of chat summaries by date to help you retrace ideas later.
🔁 Reuse Prompts via Snippets: Save common or reusable prompts in a text file or snippet manager for quick reuse.
🧩 Use External Prompt Tools: Tools like FlowGPT or PromptHero can help store, tag, and reuse prompts outside the chat interface.
📌 Sticky Notes or Widgets: Use desktop sticky notes or widgets to jot down active prompt ideas, goals, or links to ongoing chats.
Final Thoughts
Staying organized is a productivity superpower.
By grouping your conversations into projects, tagging them clearly, and using consistent naming or backup systems, you create a digital workspace that works for you, not against you.
Here’s what you gain:
🚀 Boosted Productivity: No more sifting through endless chat histories.
🧠 Mental Clarity: A cleaner workspace leads to clearer thinking and less stress.
📈 Higher Quality Outputs: With past chats and prompts at your fingertips, your work becomes more consistent, accurate, and insightful.
🛡️ Reduced Risk: Good organization habits protect your data and prevent accidental mix-ups.
🧭 Better Planning: You’ll have a clear view of your progress, allowing you to prioritize smarter and reflect on what’s working.
Enjoy!


Content was researched with assistance from advanced AI tools for data analysis and insight gathering.